The great thing about birthdays is that they happen on the same day … of the same month … every year. Yet I often find myself in a blind panic in the week leading up to that special birthday. Have I bought the right gift? wrapping paper? balloons? candles? … the all important cake?!
Once again, I recently experienced that all familiar feeling of anxiety, as my dad’s birthday seemed to appear from nowhere. My sister and I decided to make our own cake, we are not professional bakers, but we both enjoy creative activities so we were full of enthusiasm. We discussed several themes related to Dad’s interests but finally we decided on a guitar/musical theme.
Now we had a theme, we needed to agree on a design! As we had only three days to make the cake, I suggested that a regular round cake with props and/or decoration would be appropriate … and more importantly, achievable.
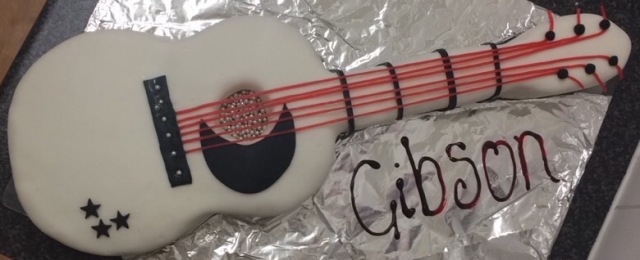
My sister, on the other hand, had other (ambitious) ideas! – A guitar shaped cake!
I admit, I had my reservations. With only 3 days to prepare, I was worried that we wouldn’t have enough time. After all, professional cake designs are required to be ordered weeks in advance. However, I had to admire my sisters ambition and positive approach towards our shared project – so I agreed – ‘Project Guitar’ was about to begin!
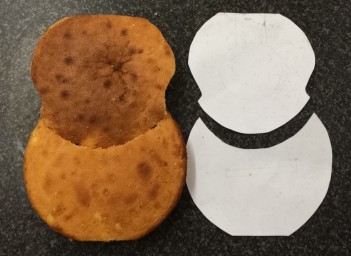
Day 1 – Bake two cakes using a 20cm round cake tin. Once cooled I put them together to form a sandwich, using baking parchment to prevent them from sticking together. I then wrapped the cakes tightly with several layers of plastic wrap and stored in a cool, dry place.
Day 2 – Today, we purchased the remaining ingredients needed to complete the cake.
Day 3 – Dad’s birthday had officially arrived!! We had only six hours to complete the cake in time for the family gathering. My sister baked two cakes using an 18cm round cake tin. The two round cakes would be used to form the body of the guitar.
Now we needed to make the two cakes resemble a guitar, but how?
We decided to draw around each cake on plain paper and cut them out to create a template for shaping the cake.
An hour later, the cake was looking good, but we still had more baking to do. Using a 900g loaf tin, we baked another cake. This would be the ‘neck’ of the guitar. We decided to use a whole cake rather than sandwich two together, as we feared that it may be two fragile.
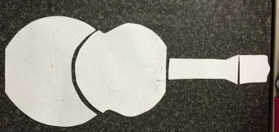
While we waited for the cake to bake and cool, we made another paper template for the ‘neck’ and the ‘headstock’. We made the head of the guitar using leftover pieces of cake that we had cut from one of the round cakes, meaning less waste! The cake from the loaf tin was cut to size once it had baked and cooled.
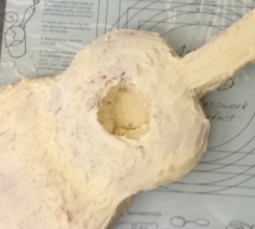
We put the cake pieces together, it was looking impressive.

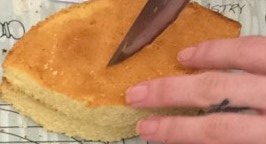
Using a cookie, I cut a whole out of the top sandwich of the 18cm cake to create the ‘sound hole’. Between us, we used a layer of jam and buttercream to sandwich the pieces together. Then covered the cake in buttercream.
The cake was ready for the fondant icing – we used ready rolled fondant as a shortcut to completion Together, we layered on the white fondant and smoothed out any imperfections.

I made a cut in the fondant covering the sound hole and smoothed it down. Using a smaller cookie cutter, I cut another piece of fondant. This was used as a base inside the sound hole, which I covered with silver sugar balls as decoration.
Next, we used black fondant (again, ready rolled) to create the ‘bridge’, ‘frets’, ‘tuners’ and ‘pick guard’. As a personal touch, the black fondant was also used to make little stars. The silver sugar balls were used to resemble the ‘bridge pins’.

We were now in the last hour of our completion window and all we had to add were the strings. Simple, right?!
Well, we had run out of black fondant and didn’t have enough time to make anything else. Thinking on our feet, we decided to ‘phone a friend’ – good old mum to the rescue! Why don’t you use confectionery laces?! Amazing!! Et voila – the cake was completed .. with 30 minutes to spare. Team effort at its best!!


")
")

